NordMende GlobeTraveler II

I recently received a beautiful NordMende GlobeTraveler II radio and I was excited about it because I had briefly checked one out many years ago and was impressed by it. Fast forward 15 years and another friend sent one to me because he wasn’t using it and thought I would like it. Well…I do! The GlobeTraveler II is the US import version of the TN6000 which looks very similar but has FM limited to 104 rather than 108 MHz.

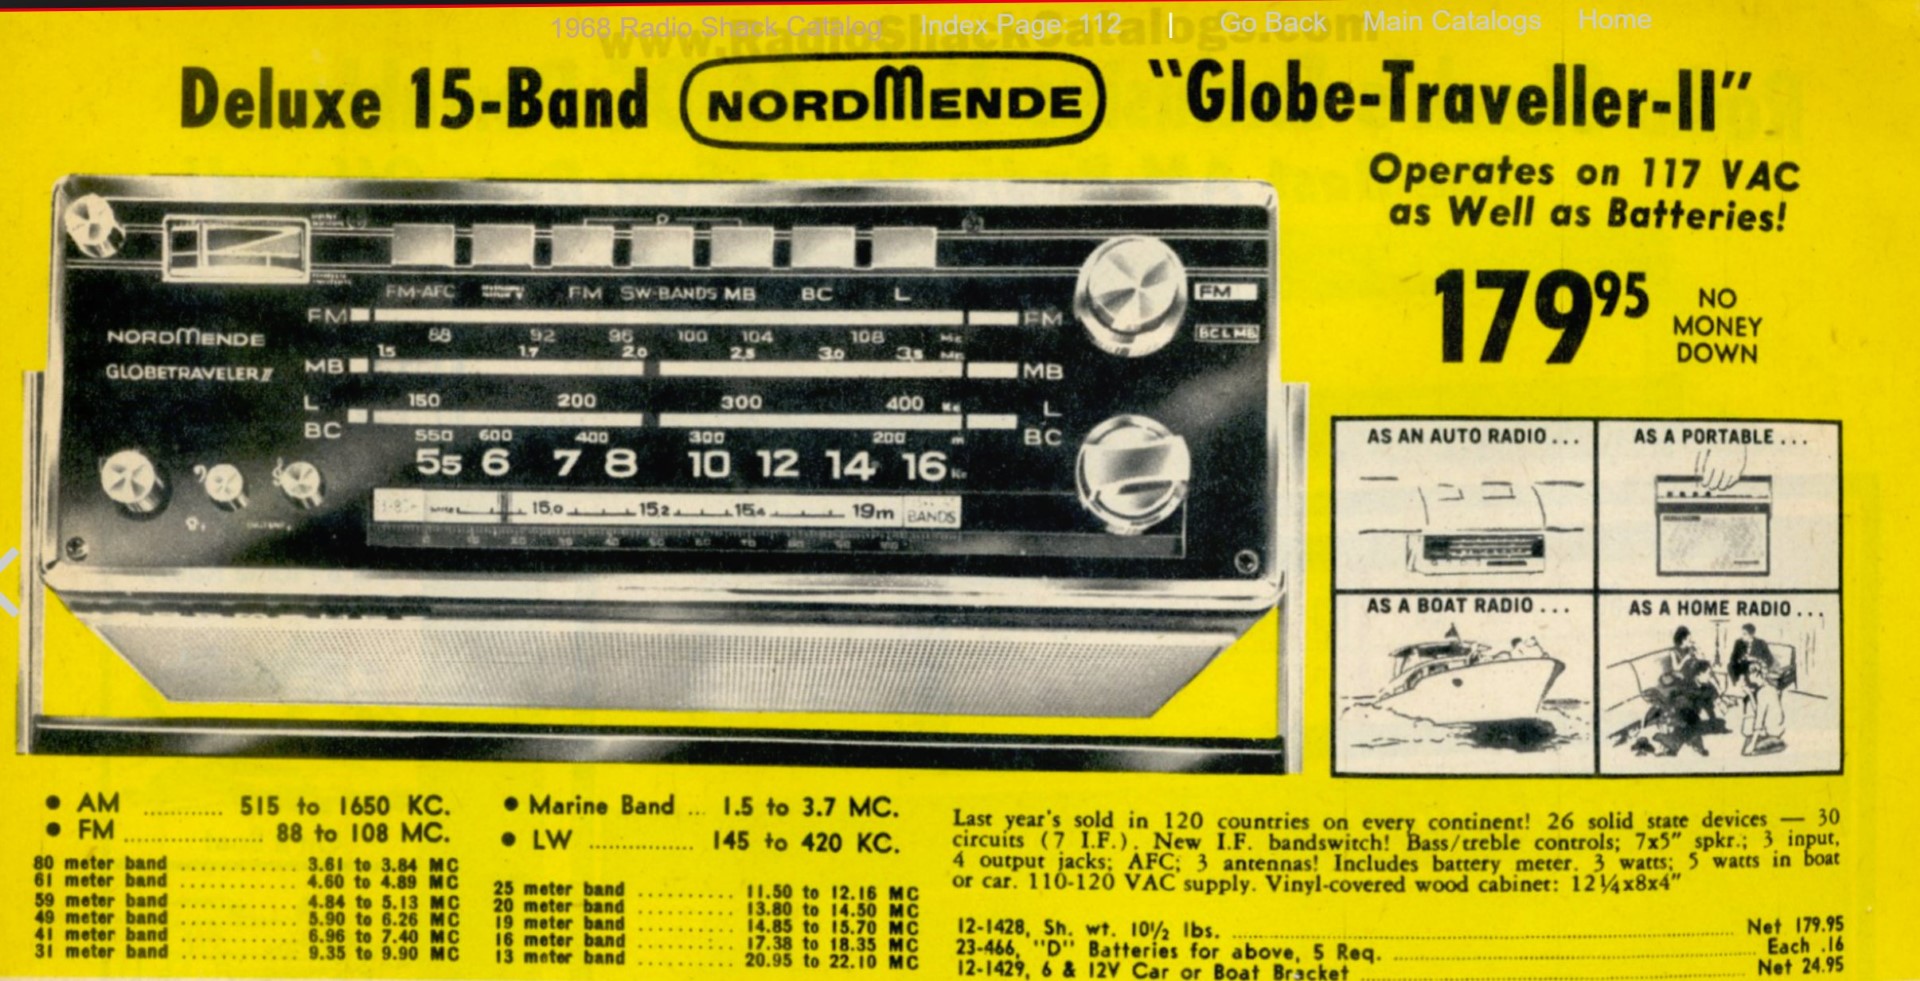
NordMende was a German company founded by Otto Mende who moved north after WW 2 thus becoming the Northern Mende company…NordMende. I’m not sure exactly how many years this model was sold but I found it in the 1968 Radio Shack catalog and the 1969 Allied catalog selling for $179.95 which translates to $1532 in 2022. How many of us would spend that much for a portable radio today? If radios were priced by the pound the GlobeTraveler II delivered the goods. Being typical of other German radios of the era such as the large Grundigs it is a very large, heavy chassis with an incredibly complex design, housed in a leatherette-covered wooden cabinet. Many technicians have quipped that if there was a more complex way to do something that’s how these old German radios were designed and they can sometimes be a real challenge to service due their complexity and difficult access.
The GlobeTraveler II Covers AM/LW/SW and FM.
Description/Specifications:
AM: 516 – 1650 KHz
LW: 145 – 420 KHz
FM: 88 – 108 MHz
Marine Band (SW): 1.5 – 3.65 MHz
SW: 11 Spread Bands with Dual Conversion & Tuned RF Stage (See Radio Shack Ad above for band coverages) 13 – 16 – 19 – 20 – 25 – 31 – 41 – 49 – 59 – 61 – 80 Meters
Size 13” x 9” x 4 ½”
Weight: 10.5 lbs
Power: AC 120/240 Volts, 5 D cells, external 7.5 DC input or 6/12 Volt with car adapter
Controls: On/Off/Volume, Bass/Press for Dial Light, Treble/Press for Battery Test, 3 Tuning knobs- 1 for AM, LW and MB, 1 for FM and 1 for the SW Spread Bands, Spread Band selector knob, 5 Band switches, FM AFC On/Off, AM Wide/Narrow.
Analog Tuning Meter
8” Ferrite Rod for AM/LW
Telescoping FM/SW antenna with “FM collar” which sets a shorter length for best FM.
On the right side are connections for External DC (7.5 V center pin Negative), AC input, External Antenna, Headphone/Speaker, Din audio In/Out.
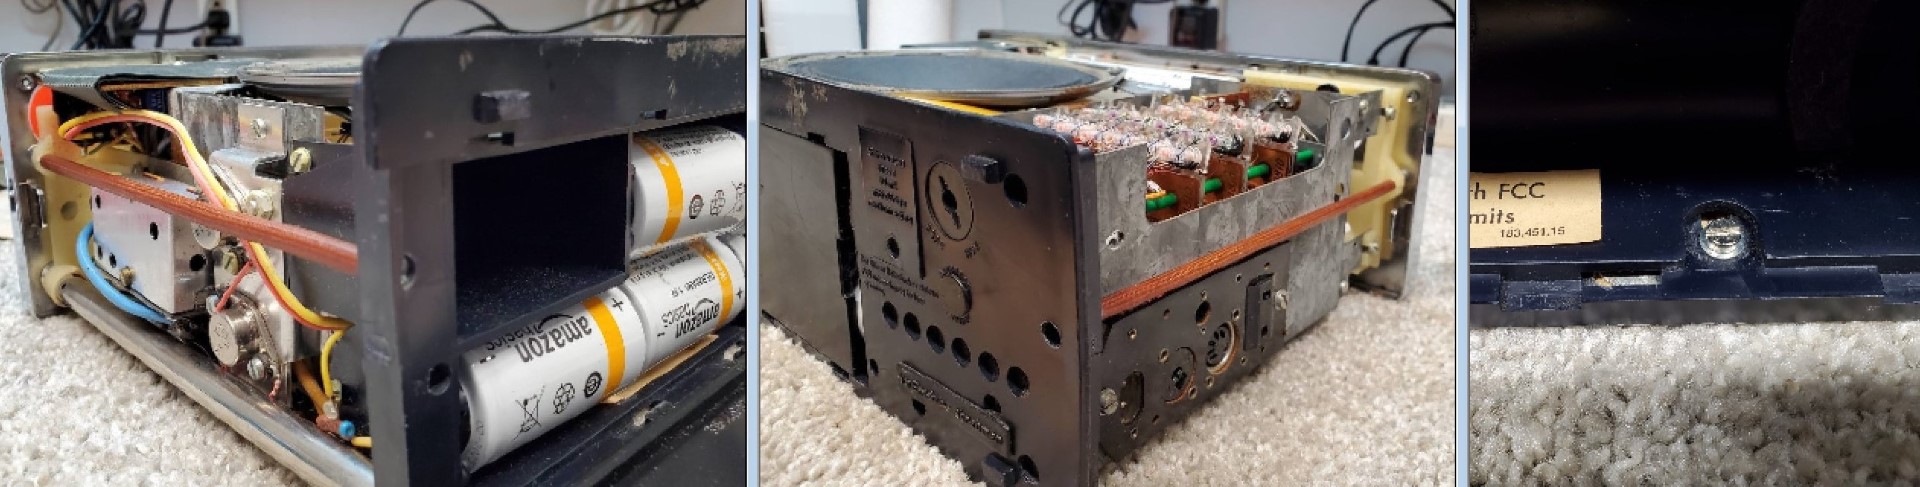
On the bottom is the battery compartment, a small storage space for the AC cord, a Voltage Selector marked 110/220 and a car connector (see story).
Speaker: 7” x 5” Oval – 3.5 Ohms
Power Output: 2 Watts/4 Watts with car adapter
Getting To Know the NordMende GlobeTraveler II:
During the past year I have been going back in time and checking out a variety of iconic all analog portable radios but I’ve got to say that this monster is among the more ambitious and complex of all of them, the likes of which I have not seen since the Grundig Satellit 210 which I dove into many years ago. I like this radio quite a bit. It is solid, very heavy and has satisfyingly robust audio which makes even SW sound wonderful. My radio arrived working but missing its battery cover which is crucial as the batteries are on the bottom and will not stay in place without it. I was extraordinarily lucky because the first time I looked on eBay I found both a battery cover and an original NordMende Service Manual both of which were in my possession within a week…kind of amazing actually.
I was surprised that all of the switches operated perfectly with no hint of noise or intermittency. I knew the radio had been serviced at some time in the past but has been in storage for several years since so this is unusual…one almost always has to deal with intermittent switches on old radios but not this time. As I tuned around, I was impressed that the dial calibration was very good on all bands except AM which was noticeably off. That would be dealt with later. One big problem though was that the SW Spread Band tuner was frozen…the dial would not move at all. I hoped this would not be an inaccessible dial string or a broken pulley. I remember how frustrating it was to replace the dial strings on my old Grundig Satellit 210 and was not eager to repeat that experience.
It is very nice to have three separate tuners with one for FM, one for the 11 SW Spread bands and one for AM/LW/MB. Not many portables offered this deluxe feature and it is very convenient to switch among bands without retuning. I also like the analog Tuning Meter which has excellent range as opposed to the all-too-common over-reading meter…this meter gives clear indications of small changes in signal level and proper tuning…very nice meter action. I also like the very large tuning scales that make for a pleasant analog tuning experience.

I was mainly interested in this radio for its AM capabilities along with its rich audio and it also has sensitive reception on SW, but if SW is your primary interest, you will find that its spread bands leave some gaps in frequency coverage and there is no SSB capability. Yes, you can still have lots of fun tuning around on SW with the Globetrotter II but again, for me the main interest was its AM/FM performance.
There are some surprises in the design of the GlobeTraveler II. In addition to three tuning gangs for the various bands there is an extra AM tuner circuit which I’ll explain. Many radios of this era were made to double as a car radio. An optional car adapter (part # 968.180) could be mounted under the dash and when the radio was slid into it, a multi-contact connector at the bottom of the radio would connect the radio to the car’s power, antenna and speaker and it would also double the audio output power from 2 to 4 watts…very cool but not unique. But what sets the NordMende apart from other radios I have seen with this general design is that NordMende went a step further and included a completely separate, variometer-tuned AM/LW front end for the automotive mode and that tuner has its own calibration adjustments completely independent of those which work when the radio is in portable mode. If I had to guess I would say that it may have been done to make the tuning more stable under the wide temperature variations you would get in a car but perhaps NordMende was able to achieve a better match to the car’s antenna this way.

Above: Jack Panel & Car Adapter Connector
The external antenna sockets are vintage and hard-to-find European connectors but in a pinch you could stick a stiff wire into them…I found the radio performed extremely well with several passive loops via induction with no direct connection to the radio…the external jack works for SW/MB only.
I like to use my portable radios on battery power for best AM/SW reception and with an all-analog radio like this powered by 5 D cells you can expect long battery life. I did note though that the DC input socket is deep and several of my DC plugs which have a right-angle design were not deep enough to use with it so a straight or longer DC plug would be needed. And remember it is center pin negative…7.5 volts.
Disassembly: At first it was not clear exactly how to do this but although it is unusual it is actually pretty easy. First you remove all the knobs on top…they are all friction fit and just pull off except the SW Spread Band selector which has two set screws. Next, there are several screws on the bottom but only TWO of them should be loosened at this stage…they are very long screws which reach all the way up to the top plate. The pictures below show which ones they are…you can see them here covered by brown tubing. Just loosen them several turns until the top plate comes loose…small washers near the top ends should keep them from falling out completely. Lift off the top metal plate, remove one more slotted head screw right near the botttom edge of the radio in the battery compartment, then lift the outer cabinet up and off of the radio. It may be tight and tricky to work loose and re-install. Be patient with it. It is not necessary to remove the clear plastic dial glass or the handle. If you do remove the top plastic dial scale for any reason do not overtighten the screws when re-installing it as the plastic can crack. Also do not lose the rectangular cardboard surround which helps hold the Tuning Meter in place.
The Handle: Some online posters have reported that the handle can let go and can’t be trusted…this means it is not properly installed. I understand how this happens because it requires a lot of force to unlock and lock it but it is similar to the design I’ve seen on many other vintage radios. To remove the handle, raise it up then push down HARD on each end and it will disengage, then spread it a bit and lift it away from the case. To reinstall it spread it to slip over the nubs on the side of the case then pull each end up HARD until it snaps into the locked position. It will NOT fall out or disengage if it is properly locked.
When re-assembling there are metal clips which hold the metal front and rear grilles to the wooden box…be sure their inner tabs are not bent outwards. Also, when sliding the cabinet back onto the chassis you have to see where things are catching on it and work them to make it slide back on…it can be a bit finicky…again be patient with it.
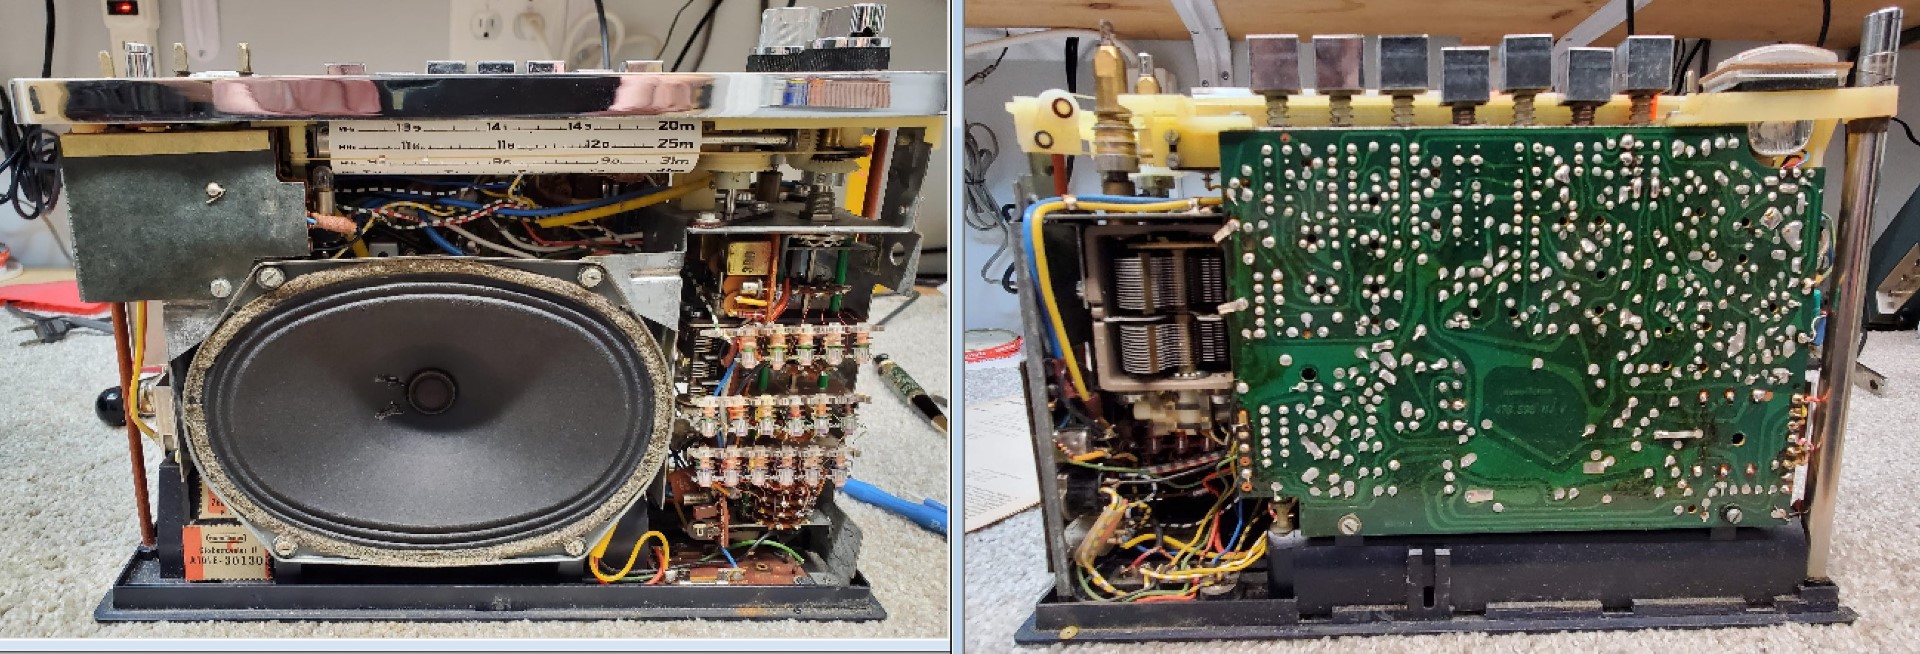
Now that the radio is out in the open you will find it is very densely packed with many components difficult to find because they are so buried under layers of components. Luckily the tuning gang and shaft for the stuck spread bands was right at the front and I found the shaft was frozen due to old lubricant…a drop of Kroil on each side of the shaft’s bearing freed it up and it was now tuning easily. Just below that is a cardboard cover which can be removed to reveal some of the Spread Band adjustments…more on that later.
This radio sports a beefy 8” ferrite rod antenna for AM/LW which should allow for good sensitivity but it is so buried it was hard to see it. More on that later as well.
Alignment: I had mentioned that the dial calibration was off on the AM band. A local station on 590 KHz was coming in at about 610 and that drives me nuts, especially when it is so obvious on the large dial….it should be more accurate than this. Part of the issue was resolved by following one of the early steps in the alignment procedure which is to make sure that when turned fully CCW the dial pointer sits directly over the hash marks at the left side of the dial scale. The pictures below show where the pointer was located before and after moving it to the left on its string to bring it directly over those hash marks which moved my 590 station down to 600…better but still not quite ideal with such a large easy to read dial.
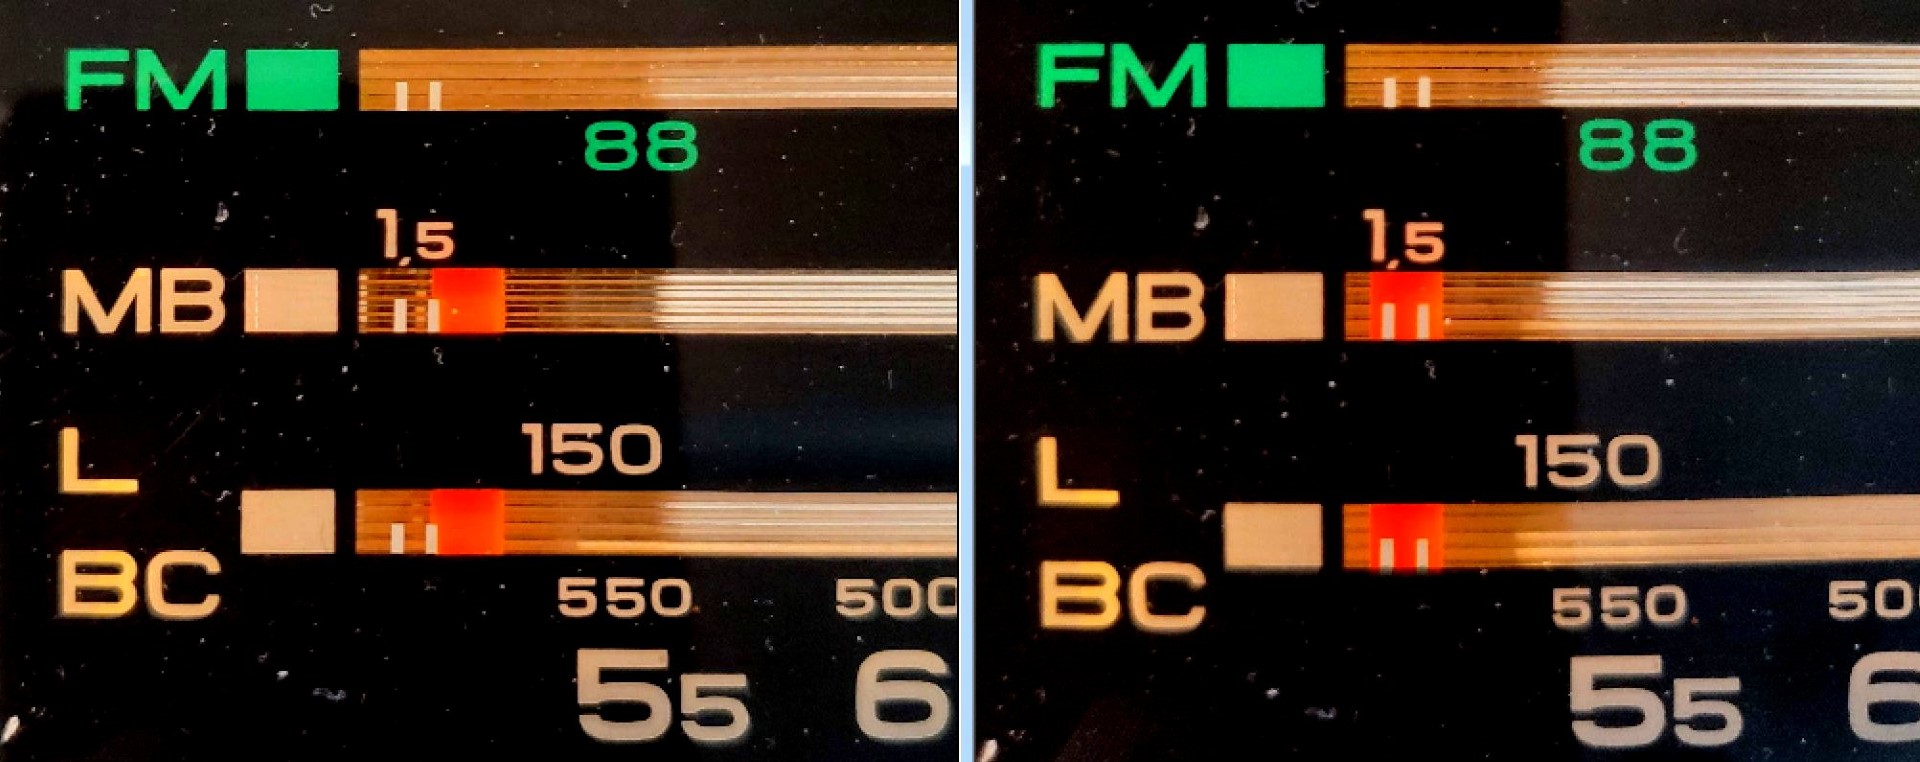
Above: Before & After repositioning dial pointer to coincide with hash mark
As usual with old analog radios I wanted to do a full alignment on it which should improve dial accuracy and maximize performance but I ran into an issue with one of the IF coils which would not adjust. I have long used a set of quality ceramic alignment tools which come in a variety of smaller sizes needed for some older imported radios but none would seem fit this coil, and as I looked into it under an illuminated magnifying lamp, I could not see any slot or hex shape on it at all…the top looked perfectly flat. By removing the speaker, I could see the other side of the coil and it looked like there was a slot on that side of the tunable core and it worked…I was able to adjust it from the other end. I don’t know if it came from the factory this way or if it was reversed by someone later but as long as it adjusted properly, I decided to leave well enough alone rather than try to reverse it. It is too easy to break these things and I’ve learned from bitter experience not to mess with these tunable slugs any more than necessary.

Red dot marks AM IF Coil discussed above
I went through the AM IF (this set uses 460 KHz) and RF adjustments which were very close on all bands other than AM…it seems odd that band alone should be off but it was. Another issue was access to the ferrite rod which has a coil which must be slid back and forth along it as part of the alignment. I could barely see the thing let alone adjust it. However, I discovered that I could see the end of the rod where this sliding coil was mounted on a plastic form which could make adjustment easy. Even more amazing was that I could see the other end of this sliding plastic form through a hole in the top plate and using a small screwdriver I was able to work the thing loose and slide it back and forth to effect the adjustment which resulted in a noticeable increase in signal strength. After the alignment all bands showed excellent dial tracking and great reception which makes me smile…I’m kind of a stickler for that. I was feeling pretty good.

Adjustable coil on ferrite rod seen through access opening
Then…another surprise. I had completed aligning all the bands except the 11 SW Spread Bands when I came upon this in the manual: “For RF-alignment of SW-tuner see backpage of circuit diagram of the coil-gang.”. What? Just when you think you’ve seen it all. I spent time researching this model in hopes of finding the missing alignment instructions but they seem not to exist. Luckily though as I expanded my search to similar NordMende models I came across an online service manual for the TN6001 which is very similar and it has all the missing info. There was a complete procedure for aligning the additional IF stage and the 11 spread bands with three adjustments points per band, along with two layout diagrams showing all the adjustment points in two sets, one facing forward (which you can see in the picture below) and the other facing the back but almost completely buried behind other components.
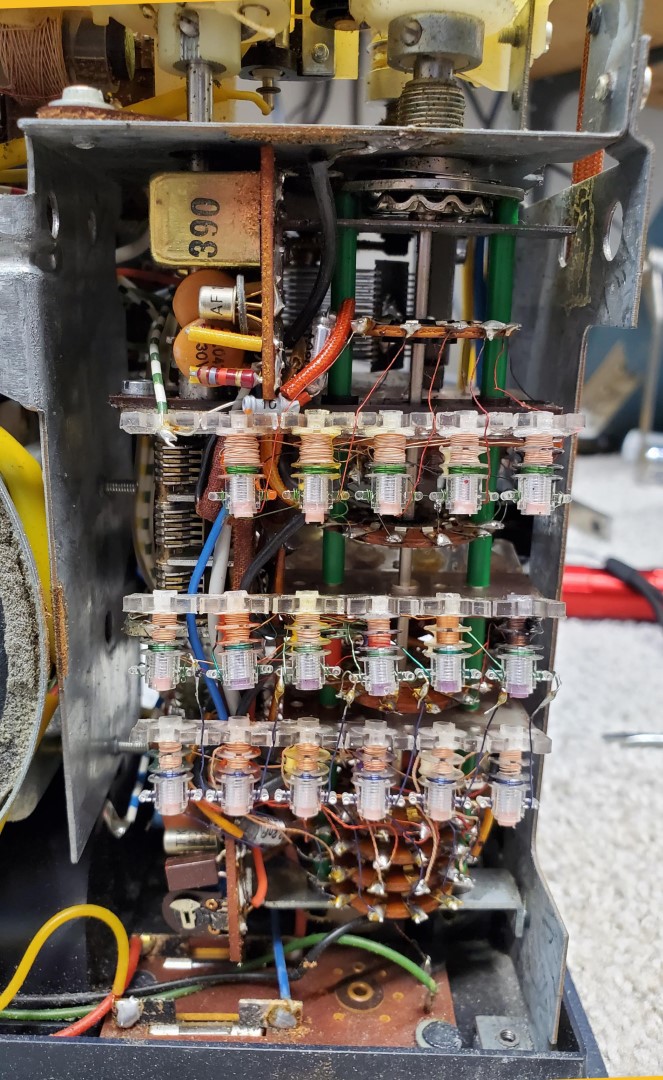
Above: Band Spread Adjustments at front – another set of these is buried inside facing the back.
Most of those rear-facing adjustments seemed inaccessible but many of these points were indeed able to be accessed through strategically placed holes in the chassis, just as those access holes which allowed me to adjust the coils on the ferrite rod. Luckily, since none of those bands were very far off I only had to get to a few of them. I spent some time checking the dial calibration on each of the 11 spread bands and found only two that were in need of adjustment and as luck would have it those oscillator adjustments and their associated RF adjustments were also right there. In the end each band showed virtually perfect dial calibration and excellent sensitivity. But the complexity of the wiring in the spread band tuner would make any serious repairs daunting to say the least.
So while the original service manual leaves a lot to be desired the manual for the following, apparently virtually identical model has everything missing from the earlier manual including disassembly instructions.
Performance: I am very happy with the GlobeTraveler II’s appearance, ergonomics, reception on all bands and sound quality. My main interest was its AM performance and I was not disappointed. After comparing it with several familiar reference radios it became clear this is a top level performer and rates **** Stars in the AM Mega Shootout. It’s AGC action is less aggressive than average which means you have to increase the volume on very weak signals but the resulting reception on AM is excellent. I spent time comparing it with two of my best AM reference portables…the Panasonic RF-2200 and C. Crane CC-2E/CC-3 and after scanning every receivable frequency I’ve got to say the Globetrotter ran neck and neck with them on all but a handful of signals and it was necessary to compare these radios in a very low noise environment to discern the differences. And although the AGC has a gentle action it’s time constant worked very well minimizing flutter on rapidly-fading signals at twilight.

Left: CC Radio 3 – Center: GlobeTravaler II – Right: Panasonic RF-2200
SW reception was also impressive. The SW reception was as sensitive as any portable I compared it with, and with its tuned RF stage and double conversion on SW it outperformed many modern portables on weak signals. That, along with its excellent sound quality made SW signals enjoyable to listen to. Again, the 11 Spread Bands do have some gaps in coverage and there is no SSB but it is still a fun radio to band scan with. If you have very strong FM signals in your area there may be breakthrough on some frequencies but that was not an issue at my location.
FM reception was exceptional and far better than many vintage FM portables with superb sensitivity and excellent selectivity. It ran neck and neck with my FM reference portables and it will rate ***** on the FM Mega Shootout list. For the FM enthusiast the NordMende will not disappoint and its warm, full audio are a real treat on FM. Be sure to use the collar on the whip to pull out only the correct length for FM.

Conclusion: The NordMende Globetrotter II is a great radio from the golden age of all-analog solid-state portables. Typical of many designs of its day it is extremely heavy and solid, and although its complexity may sometimes create a challenge if service is needed, it represents a top tier of build and operational quality. Although my unit had that frozen tuning pulley it seemed to work quite well otherwise so if it hadn’t had that tuning issue it could have been used as is. The fact that all of the switches and controls are perfect with no cleaning needed is rare as well so that is another testament to its quality.
There doesn’t seem to be much information about the Globetrotter II or other NordMende radios online so this was very much a journey of discovery for me. The Globetrotter II joins my list of top analog portable radios and I’m glad I finally got to know it.
Recommended

You must be logged in to post a comment.